Wednesday 27 April 2016
Friday 22 April 2016


Tuesday 22 March 2016
Construction: Editing
When we were all ready with planning and happy with our footage for our horror opening we moved on to our editing process. We decided to monitor and record our editing process with the use of screenshots for evidence that we editing the opening ourselves. Once we were sure that all footage had been recorded properly and imported onto the Mac system we started our editing process.

I started by clicking new project after being prompted with this window when premier pro was opened.

After clicking new project we were given to option to change various options, but the only thing that concerned us is the location of project and its name. The location was set to desktop to ensure we don't lose it and the name was 'The Unknown' which was our horror opening title.

After this we were given the option the change the sequence preset, which was important to change to DSLR 720p50 as that was our quality of footage, if we clicked another option the output would be a lower quality and possibly not in frame size. Our sequence name was also 'The Unknown'.

Once I clicked OK I was brought this workplace where were ready to start our project. We started by adding all of our footage taken into premier pro to be selected.

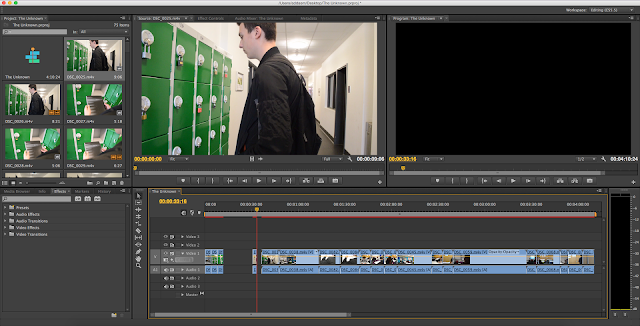
After all of our footage was put into our project we watched the numerous takes for each shot to choose what was the best and most suitable for our opening, after this we inserted each shot chosen in order to our sequence next to each other.

Now that every shot was in place we were ready to start editing. The first thing I did was trim each shot to suitable length, keeping in mind three factors. Each shot adding up to around 2 minutes, trimming any signs of non-acting and keeping the most important parts in. I used orange cursor to scrub through to where I thought it was necessary to be a cut in the sequence. I then used the razor tool, kept it in line with the red line and clicked to split the shot into one usable shot and one that can be deleted.
I continued to do this with the rest of the shots until each shot was trimmed so there was no non-acting, linked with previous shot and had no other voices from director.

Once all the shots were trimmed to the right length I then went onto moving each shot next to each other.

After I complied each shot into one fine string of footage I then decided to watch it through as placing each shot next to each other will easily display any match-on-action mistakes.

Whilst watching it I spotted one match-on-action mistake right here (where the line is on the sequence)

I moved the clip on the right apart from the faulty shot to give me room and not accidentally cut the wrong shot, I then used the razor tool to trim the shot, delete the fault and place the shots back next to each other.

I also noticed one match-on-action mistake on the last shot that I took care of using the same method.

After I was done trimming all the footage to a good time limit, I decided to watch it once more to see if it flows throughout properly. After seeing that is played fine I was ready to move on to effects.

Looking in the right, I was given several options on how to add effects to our shots. I decided not add numerous and eye catching effects to our project as I felt it would reduce the potential of how scary our opening could get. In this case I decided to choose cross dissolve, as it was subtle and work well with our shots.

After adding the transition effect to our shot to open our film softly, I decided to keep the duration as it suited the shot and time well.

I did this to all of the shots necessary and even changed the duration of effect on certain shots as it was too quick. Once the effects were set we were ready to start adding our opening titles, which we decided to be placed in between shots.

To start I clicked Title > New Title > then chose the default still as I didn't want any effects on the titles.

I kept to the default size and renamed the title to what it would show.

I created the title with all the factors we decided on in the post (Construction: Planning Titles).

After I was happy with how the titles looked as well as the duration of them I then went on to do the rest. After doing all of the titles I was ready to start placing them into our sequence.

I started by placing the production company opening title before the footage and continued to add more.

I decided to add 3 for the beginning and allow the rest to be separate from each other; this is because I wanted the Production Company, Distribution Company and maker of film to be close to each other.

I then proceeded to add a cross dissolve transition effect at the beginning of the title to intro smoothly.

I then extended the duration of the video transition as I felt that it was too short and looked rushed.

I then went on to add the remaining titles to the rest of my sequence, which I had previously worked out where the title would go and how many there would be.

After I had completed adding all the titles I then decided to watch the whole thing through to ensure everything went smoothly.

After I was happy with the project so far I decided to render it and export it to be shown on my blog without non-diegetic sound to be able to compare the difference and the impact sound has.

Once fully rendered I was ready to export my project without non-diegetic sound.

I clicked File > Export > Media to start the export process of my sequence so far.

I then chose the highest quality to be exported and clicked export.
Once full exported, I then uploaded it to YouTube and embedded it, after this I went to carry on my project to be finalised with non-diegetic. Exporting and watching this through with an audience was very useful as it gave me a chance to receive suggestions and constructive criticism. They were able to spot out two spelling errors, which were vital, and a suggestion to have a logo, which I later added.

I used the page www.freesoung.org to get all of my sound due to the copyright restrictions we faced.

After a hard search and a long decision making with the group, we agreed on which sounds would best the project. Once downloaded I would put them in a folder I made and rename each file for ease of access as the default name was very hard to distinguish.

I then imported all of the sounds I had gathered into my project to be editing into our sequence.

To start my editing with sound, I dropped the audio level down so I can accurately alter specific areas of the footage audio.

I then added my choice of intro sound for opening to the beginning of the sequence.

After this I added another war horn file to the sequence, as I didn't want any of the footage to be played without non-diegetic sound as it quickly reduces tension and the scary atmosphere. I also added 2 key frames to the end of one of the clips so that I could make the sound diegetic audio decrease as the title came in.

After this I added the remaining sound files needed in the sequence to ensure the mood was correctly set, altered various pieces of diegetic sound so that it would not interfere with some of the non-diegetic audio with the use of several key frames and as well as altering all of the non-diegetic sound that I had added to the sequence so that it would flow with the titles and footage I added audio effects to make it sound better. I also increased and decreased several parts of the sequence for dialogue to be heard clearer and sounds to have more empathy when introduced into the sequence. In addition to this I also added a logo to the sequence which was a suggestion made by an audience that viewed my project without non-diegetic sound.

At this point, my group and I watched our final piece twice to ensure that everything was fine and that there would be no changes needed before we exported. Once happy with the project I made sure everything was rendered properly then went to export the project.

When exporting I chose to export with the maximum quality. After I had exported it to my desktop, I went on to uploading it to YouTube where it would be embedded into another post. I was now done with the editing process.

I started by clicking new project after being prompted with this window when premier pro was opened.

After clicking new project we were given to option to change various options, but the only thing that concerned us is the location of project and its name. The location was set to desktop to ensure we don't lose it and the name was 'The Unknown' which was our horror opening title.

After this we were given the option the change the sequence preset, which was important to change to DSLR 720p50 as that was our quality of footage, if we clicked another option the output would be a lower quality and possibly not in frame size. Our sequence name was also 'The Unknown'.

Once I clicked OK I was brought this workplace where were ready to start our project. We started by adding all of our footage taken into premier pro to be selected.

After all of our footage was put into our project we watched the numerous takes for each shot to choose what was the best and most suitable for our opening, after this we inserted each shot chosen in order to our sequence next to each other.

Now that every shot was in place we were ready to start editing. The first thing I did was trim each shot to suitable length, keeping in mind three factors. Each shot adding up to around 2 minutes, trimming any signs of non-acting and keeping the most important parts in. I used orange cursor to scrub through to where I thought it was necessary to be a cut in the sequence. I then used the razor tool, kept it in line with the red line and clicked to split the shot into one usable shot and one that can be deleted.

I continued to do this with the rest of the shots until each shot was trimmed so there was no non-acting, linked with previous shot and had no other voices from director.

Once all the shots were trimmed to the right length I then went onto moving each shot next to each other.

After I complied each shot into one fine string of footage I then decided to watch it through as placing each shot next to each other will easily display any match-on-action mistakes.

Whilst watching it I spotted one match-on-action mistake right here (where the line is on the sequence)

I moved the clip on the right apart from the faulty shot to give me room and not accidentally cut the wrong shot, I then used the razor tool to trim the shot, delete the fault and place the shots back next to each other.

I also noticed one match-on-action mistake on the last shot that I took care of using the same method.

After I was done trimming all the footage to a good time limit, I decided to watch it once more to see if it flows throughout properly. After seeing that is played fine I was ready to move on to effects.

Looking in the right, I was given several options on how to add effects to our shots. I decided not add numerous and eye catching effects to our project as I felt it would reduce the potential of how scary our opening could get. In this case I decided to choose cross dissolve, as it was subtle and work well with our shots.

After adding the transition effect to our shot to open our film softly, I decided to keep the duration as it suited the shot and time well.

I did this to all of the shots necessary and even changed the duration of effect on certain shots as it was too quick. Once the effects were set we were ready to start adding our opening titles, which we decided to be placed in between shots.

To start I clicked Title > New Title > then chose the default still as I didn't want any effects on the titles.

I kept to the default size and renamed the title to what it would show.

I created the title with all the factors we decided on in the post (Construction: Planning Titles).

After I was happy with how the titles looked as well as the duration of them I then went on to do the rest. After doing all of the titles I was ready to start placing them into our sequence.

I started by placing the production company opening title before the footage and continued to add more.

I decided to add 3 for the beginning and allow the rest to be separate from each other; this is because I wanted the Production Company, Distribution Company and maker of film to be close to each other.

I then proceeded to add a cross dissolve transition effect at the beginning of the title to intro smoothly.

I then extended the duration of the video transition as I felt that it was too short and looked rushed.

I then went on to add the remaining titles to the rest of my sequence, which I had previously worked out where the title would go and how many there would be.

After I had completed adding all the titles I then decided to watch the whole thing through to ensure everything went smoothly.

After I was happy with the project so far I decided to render it and export it to be shown on my blog without non-diegetic sound to be able to compare the difference and the impact sound has.

Once fully rendered I was ready to export my project without non-diegetic sound.

I clicked File > Export > Media to start the export process of my sequence so far.

I then chose the highest quality to be exported and clicked export.
Once full exported, I then uploaded it to YouTube and embedded it, after this I went to carry on my project to be finalised with non-diegetic. Exporting and watching this through with an audience was very useful as it gave me a chance to receive suggestions and constructive criticism. They were able to spot out two spelling errors, which were vital, and a suggestion to have a logo, which I later added.

I used the page www.freesoung.org to get all of my sound due to the copyright restrictions we faced.

After a hard search and a long decision making with the group, we agreed on which sounds would best the project. Once downloaded I would put them in a folder I made and rename each file for ease of access as the default name was very hard to distinguish.

I then imported all of the sounds I had gathered into my project to be editing into our sequence.

To start my editing with sound, I dropped the audio level down so I can accurately alter specific areas of the footage audio.

I then added my choice of intro sound for opening to the beginning of the sequence.

After this I added another war horn file to the sequence, as I didn't want any of the footage to be played without non-diegetic sound as it quickly reduces tension and the scary atmosphere. I also added 2 key frames to the end of one of the clips so that I could make the sound diegetic audio decrease as the title came in.

After this I added the remaining sound files needed in the sequence to ensure the mood was correctly set, altered various pieces of diegetic sound so that it would not interfere with some of the non-diegetic audio with the use of several key frames and as well as altering all of the non-diegetic sound that I had added to the sequence so that it would flow with the titles and footage I added audio effects to make it sound better. I also increased and decreased several parts of the sequence for dialogue to be heard clearer and sounds to have more empathy when introduced into the sequence. In addition to this I also added a logo to the sequence which was a suggestion made by an audience that viewed my project without non-diegetic sound.

At this point, my group and I watched our final piece twice to ensure that everything was fine and that there would be no changes needed before we exported. Once happy with the project I made sure everything was rendered properly then went to export the project.

When exporting I chose to export with the maximum quality. After I had exported it to my desktop, I went on to uploading it to YouTube where it would be embedded into another post. I was now done with the editing process.
Subscribe to:
Posts (Atom)